

High Level Overview:
- Import Management Packs
- Create a resource pool for monitoring Unix/Linux servers
- Configure the Xplat certificates (export/import) for each management server in the pool.
- Create and Configure Run As accounts for Unix/Linux.
- Configure the sudoers file
- Discover and deploy the agents
Import Management Packs:
The core Unix/Linux libraries are already imported when you install SCOM 2022, but not the detailed MP’s for each Linux OS version. These are on the installation media, in the \ManagementPacks directory. Import ONLY the specific ones for the Unix or Linux Operating systems that you plan to monitor.
Additionally, there is a download location for Unix/Linux MP’s which have been *UPDATED*, however, the updated MP’s do not contain all Unix/Linux packs, so you should always START by importing the relevant management packs from the SCOM 2022 Media.

Here is an example of the MP’s I will import, which is all the important core libraries, and includes Red Hat, and Universal Linux (CentOS, Debian, Oracle, Ubuntu, etc)

Once these above are imported – THEN we can update to the most current ones available for those MP’s that have updates:
The *LATEST* version of these MP’s (and the ones you should be using) are located for download at:
https://www.microsoft.com/en-us/download/details.aspx?id=104213
Download those, and then import any relevant updated libraries. The following screenshot shows version 10.22.1039.0 which was from the SCOM 2022 UR1 timeframe as an example:

***NOTE: You will need to restart the Microsoft Monitoring Agent service on all Management Servers that will monitor Linux systems, after importing these management packs, before continuing. This restart is required to allow each MS to deploy the agent files locally. You can verify you have the correct Linux agent files deployed here:

Create a resource pool for monitoring UNIX/Linux servers
This pool will be used and associated with management servers that are dedicated for monitoring Unix/Linux systems in larger environments, or may include existing management servers that also manage Windows agents or Gateways in smaller environments. Regardless, it is a best practice to create a new resource pool for this purpose, and will ease administration, and scalability expansion in the future.
Under Administration, find Resource Pools in the console:

Let’s create a new one by selecting “Create Resource Pool” from the task pane on the right, and call it “UNIX/Linux Monitoring Resource Pool”
Click Add and then click Search to display all management servers. Select the Management servers that you want to perform Unix and Linux Monitoring. If you only have 1 MS, this will be easy. For high availability – you need at least two management servers in the pool.
Add your management servers and create the pool. In the actions pane – select “View Resource Pool Members” to verify membership.

Configure the Xplat certificates (export/import) for each management server in the pool
Operations Manager uses certificates to authenticate access to the computers it is managing. When the Discovery Wizard deploys an agent, it retrieves the certificate from the agent, signs the certificate, deploys the certificate back to the agent, and then restarts the agent.
To configure for high availability, each management server in the resource pool must have all the root certificates that are used to sign the certificates that are deployed to the agents on the UNIX and Linux computers. Otherwise, if a management server becomes unavailable, the other management servers would not be able to trust the certificates that were signed by the server that failed.
We provide a tool to handle the certificates, named scxcertconfig.exe. Essentially what you must do, is to log on to EACH management server that will be part of a Unix/Linux monitoring resource pool, and export their SCX (cross plat) certificate to a file share. Then import each others certificates so they are trusted.
If you only have a SINGLE management server, or a single management server in your pool, you can skip this step, then perform it later if you ever add Management Servers to the Unix/Linux Monitoring resource pool.
In this example – I have two management servers in my Unix/Linux resource pool, OM1 and OM2. Open a command prompt on each MS, and export the cert:
On OM1:
C:\Program Files\Microsoft System Center\Operations Manager\Server>scxcertconfig.exe -export \\servername\sharename\OM1.cer
On OM2:
C:\Program Files\Microsoft System Center\Operations Manager\Server>scxcertconfig.exe -export \\servername\sharename\OM2.cer
Once all certs are exported, you must IMPORT the other management server’s certificate:
On OM1:
C:\Program Files\Microsoft System Center\Operations Manager\Server>scxcertconfig.exe -import \\servername\sharename\OM2.cer
On OM2:
C:\Program Files\Microsoft System Center\Operations Manager\Server>scxcertconfig.exe -import \\servername\sharename\OM1.cer
If you fail to perform the above steps – you will get errors when running the Linux agent deployment wizard later.
You can verify these certificates in the MMC, in the Certificates snap-in, by viewing them under Trusted Root Certification Authorities:

Create and Configure Run As accounts for Unix/Linux
Next up we need to create our run-as accounts for Linux monitoring. This is documented here: (Link)
We will need Three RunAs accounts (but only two credentials)
Credentials in my example:
- scommaint – an account used for agent maintenance and SSH to install, sign certificates, and uninstall agents. Uses sudo elevation.
- scommon – an account used for monitoring. Uses sudo elevation on some workflows, and not on others.
RunAs accounts:
- UNIX/Linux Agent Maintenance Account
- UNIX/Linux Privileged Monitoring Account
- UNIX/Linux Monitoring Account
We need to select “UNIX/Linux Accounts” under administration, then “Create Run As Account” from the task pane. This kicks off a special wizard for creating these accounts.

First – we will create the Agent Maintenance Account.
This account is used for SSH, to be able to deploy, install, uninstall, upgrade, sign certificates, all dealing with the agent on the UNIX/Linux system, and will use elevation.
Select “Create Run As Account” and choose “Agent maintenance account”. Give the account a name such as “UNIX/Linux Agent Maintenance Account”
From here you can choose to use a SSH key, or a username and password credential only. You also can choose to leverage a privileged account, or a regular account that uses sudo. I will be choosing the most typical – which is an account that will leverage sudo. My account name is “scommaint”.
Next – depending on your OS and elevation standards – choose to use sudo elevation:


Always choose More Secure and click Create.
Now – since we chose More Secure – we must configure the distribution of the Run As account. Find your “UNIX/Linux Agent Maintenance Account” you just created, and open the properties. On the Distribution Security screen, click Add, then select “Search by resource pool name” and click search. Find your Unix/Linux monitoring resource pool, highlight it, and click Add, then OK. This will distribute this account credential to all Management servers in our pool:

Click Save.
Next, Lets create the Privileged Monitoring account, which will use elevation when needed. Give the monitoring account a display name such as UNIX/Linux Privileged Monitoring Account, and click Next.
On the next screen, type in the credentials that you want to use for monitoring the UNIX/Linux system(s). These accounts must exist on each UNIX/Linux system and have the required permissions granted. My account name is “scommon”

On the above screen – select to elevate this account with sudo. This is a privileged account that we will associate with a Privileged RunAs profile for workflows that require sudo elevation.
On the next screen, always choose “more secure” and click “Create”.
Now – since we chose More Secure – we must configure the distribution of the Run As account. Find your “UNIX/Linux Privileged Monitoring Account” you just created, and open the properties. On the Distribution Security screen, click Add, then select “Search by resource pool name” and click search. Find your Unix/Linux monitoring resource pool, highlight it, and click Add, then OK. This will distribute this account credential to all Management servers in our pool:

Click Save.
Last, lets create the Monitoring account (that does not use sudo). Give the monitoring account a display name such as UNIX/Linux Monitoring Account, and click Next.
On the next screen, type in the credentials that you want to use for monitoring the UNIX/Linux system(s). These accounts must exist on each UNIX/Linux system and have the required permissions granted. My account name is “scommon”

On the above screen – select “Do not use elevation”. This is an unprivileged account that we will associate with a RunAs profile for workflows that does not require sudo elevation.
On the next screen, always choose “more secure” and click “Create”.
Now – since we chose More Secure – we must configure the distribution of the Run As account. Find your “UNIX/Linux Monitoring Account” you just created, and open the properties. On the Distribution Security screen, click Add, then select “Search by resource pool name” and click search. Find your Unix/Linux monitoring resource pool, highlight it, and click Add, then OK. This will distribute this account credential to all Management servers in our pool:

Here is what it will look like when complete:

Now that our accounts are created, we must configure the Run As profiles.
There are three profiles for Unix/Linux accounts:

The Unix/Linux Agent Maintenance Account profile is strictly for agent installs, signing, updates, uninstalls, anything that requires SSH. This will always be associated with a privileged (or sudo elevated) account that has access via SSH, and was created using the Run As account wizard above.
The other two Profiles are used for Monitoring workflows. These are:
Unix/Linux Privileged account
Unix/Linux Action Account
The Privileged Account Profile will always be associated with a Run As account like we created above, that is Privileged OR a unprivileged account that has been configured with elevation via sudo. This is what any workflows that typically require elevated rights will execute as.
The Action account is what all your basic monitoring workflows will run as. This will generally be associated with a Run As account, like we created above, but would be used with a non-privileged user account on the Linux systems, and wont request sudo elevation.
I will start with the Unix/Linux Agent Maintenance Account profile. Right click it – choose properties, and on the Run As Accounts screen, click Add, then select our “Unix/Linux Agent Maintenance Account ”. Leave the default of “All Targeted Objects” and click OK, then Save.
Repeat this same process for the Unix/Linux Privileged Account profile, and associate it with your “UNIX/Linux Privileged Monitoring Account”.
Repeat this same process for the Unix/Linux Action Account profile, but use the “Unix/Linux Monitoring Account”.
Configure sudoers file
I need to modify the sudoers file on each UNIX/Linux server, to grant the granular permissions.
NOTE: The sudoers configuration changes with each version of SCOM.
Here is a sample sudoers file for Universal operating systems, in SCOM 2022, taken from here: https://social.technet.microsoft.com/wiki/contents/articles/7375.scom-configuring-sudo-elevation-for-unix-and-linux-monitoring.aspx
#----------------------------------------------------------------------------------------
#Example user configuration for SCOM agent
#Example assumes users named: scommaint & scommon
#Replace usernames & corresponding /tmp/scx-<username> specification for your environment

#General requirements
Defaults:scommaint !requiretty

#Agent maintenance
##Certificate signing
scommaint ALL=(root) NOPASSWD: /bin/sh -c cp /tmp/scx-scommaint/scx.pem /etc/opt/microsoft/scx/ssl/scx.pem; rm -rf /tmp/scx-scommaint; /opt/microsoft/scx/bin/tools/scxadmin -restart
scommaint ALL=(root) NOPASSWD: /bin/sh -c cat /etc/opt/microsoft/scx/ssl/scx.pem
scommaint ALL=(root) NOPASSWD: /bin/sh -c if test -f /opt/microsoft/omsagent/bin/service_control; then cp /tmp/scx-scommaint/omsadmin.conf /etc/opt/microsoft/omsagent/scom/conf/omsadmin.conf; /opt/microsoft/omsagent/bin/service_control restart scom; fi
##Install or upgrade
scommaint ALL=(root) NOPASSWD: /bin/sh -c sh /tmp/scx-scommaint/scx-1.[5-9].[0-9][0-9]-[0-9].universal[[\:alpha\:]].[[\:digit\:]].x[6-8][4-6].sh --install --enable-opsmgr; EC=$?; cd /tmp; rm -rf /tmp/scx-scommaint; exit $EC
scommaint ALL=(root) NOPASSWD: /bin/sh -c sh /tmp/scx-scommaint/scx-1.[5-9].[0-9]-[0-9].universal[[\:alpha\:]].[[\:digit\:]].x[6-8][4-6].sh --install --enable-opsmgr; EC=$?; cd /tmp; rm -rf /tmp/scx-scommaint; exit $EC
scommaint ALL=(root) NOPASSWD: /bin/sh -c sh /tmp/scx-scommaint/scx-1.[5-9].[0-9][0-9]-[0-9].universal[[\:alpha\:]].[[\:digit\:]].x[6-8][4-6].sh --upgrade --enable-opsmgr; EC=$?; cd /tmp; rm -rf /tmp/scx-scommaint; exit $EC
scommaint ALL=(root) NOPASSWD: /bin/sh -c sh /tmp/scx-scommaint/scx-1.[5-9].[0-9]-[0-9].universal[[\:alpha\:]].[[\:digit\:]].x[6-8][4-6].sh --upgrade --enable-opsmgr; EC=$?; cd /tmp; rm -rf /tmp/scx-scommaint; exit $EC
##Uninstall
scommaint ALL=(root) NOPASSWD: /bin/sh -c /opt/microsoft/scx/bin/uninstall
scommaint ALL=(root) NOPASSWD: /bin/sh -c if test -f /opt/microsoft/omsagent/bin/omsadmin.sh; then if test "$(/opt/microsoft/omsagent/bin/omsadmin.sh -l | grep scom | wc -l)" \= "1" && test "$(/opt/microsoft/omsagent/bin/omsadmin.sh -l | wc -l)" \= "1" || test "$(/opt/microsoft/omsagent/bin/omsadmin.sh -l)" \= "No Workspace"; then /opt/microsoft/omsagent/bin/uninstall; else /opt/microsoft/omsagent/bin/omsadmin.sh -x scom; fi; else /opt/microsoft/scx/bin/uninstall; fi

##Log file monitoring
scommon ALL=(root) NOPASSWD: /opt/microsoft/scx/bin/scxlogfilereader -p
###Examples
#Custom shell command monitoring example – replace <shell command> with the correct command string
#scommon ALL=(root) NOPASSWD: /bin/sh -c echo error
##For ubuntu18
#scommon ALL=(root) NOPASSWD: /bin/bash -c echo error
#Daemon diagnostic and restart recovery tasks example (using cron)
#scommon ALL=(root) NOPASSWD: /bin/sh -c ps -ef | grep cron | grep -v grep
#scommon ALL=(root) NOPASSWD: /usr/sbin/cron &
#End user configuration for SCOM agent
#-----------------------------------------------------------------------------------
I will edit my sudoers file on my Linux servers and insert this configuration. You can use vi, visudo, or my personal favorite since I am a Windows guy – download and install WINSCP, which will allow a gui editor of the files and helps anytime you need to transfer files to and from Windows and UNIX/Linux using SSH. Generally we want to place this configuration in the appropriate section of the sudoers file – not at the end. There are items at the end of the file that need to stay there. I put this right after the existing “Defaults” section in the existing sudoers configuration, and save it.
Discover and deploy the agents
Run the discovery wizard.

Click “Add”:

Here you will type in the FQDN of the Linux/Unix agent, its SSH port, and then choose All Computers in the discovery type. ((We have another option for discovery type – if you were manually installing the Unix/Linux agent (which is really just a simple provider) and then using a signed certificate to authenticate))
Check the box next to “Use Run As Credentials”. This will leverage our existing Agent Maintenance account for the discovery and deployment.

Click “Save”. On the next screen – select a resource pool. We will choose the resource pool that we already created. Click “Discover”
There are MANY reasons discovery might fail. Look at the results and see if they are documented: SCOM Wiki

Check the box next to your discovered system – and click “Manage” to deploy the agent.

Oops!

That failed. I click details and see:
Agent verification failed. Error detail: The server certificate on the destination computer (ubuntu20.opsmgr.net:1270) has the following errors:
The SSL certificate contains a common name (CN) that does not match the hostname.
It is possible that:
1. The destination certificate is signed by another certificate authority not trusted by the management server.
2. The destination has an invalid certificate, e.g., its common name (CN) does not match the fully qualified domain name (FQDN) used for the connection. The FQDN used for the connection is: ubuntu20.opsmgr.net.
3. The servers in the resource pool have not been configured to trust certificates signed by other servers in the pool.
Essentially – I need to regenerate the certificate using a command to include the hostname, as that is how SCOM will interact with it:
/opt/microsoft/scx/bin/tools/scxsslconfig -f -h <hostname> -d <domain.name>
From: Certificate Issues | Microsoft Learn

This will take some time to complete, as the agent is checked for the correct FQDN and certificate, the management servers are inspected to ensure they all have trusted SCX certificates (that we exported/imported above) and the connection is made over SSH, the package is copied down, installed, and the final certificate signing occurs. If all of these checks pass, we get a success!
There are several things that can fail at this point. See the troubleshooting section at the end of this article.
Monitoring Linux servers:
Assuming we got all the way to this point with a successful discovery and agent installation, we need to verify that monitoring is working. After an agent is deployed, the Run As accounts will start being used to run discoveries, and start monitoring. Once enough time has passed for these, check in the Administration pane, under Unix/Linux Computers, and verify that the systems are not listed as “Unknown” but discovered as a specific version of the OS:
Here is what we expect after a few minutes:

Next – go to the Monitoring pane – and select the “Unix/Linux Computers” view at the top. Look that your systems are present and there is a green healthy check mark next to them:

Next – expand the Unix/Linux Computers folder in the left tree (near the bottom) and make sure we have discovered the individual objects, like Linux Server State, Logical Disk State, and Network Adapter state:

Run Health explorer on one of the discovered Linux Server State objects. Remove the filter at the top to see all the monitors for the system:

Close health explorer.
Select the Operating System Performance view. Review the performance counters we collect out of the box for each monitored OS.

Out of the box – we discover and apply a default monitoring template to the following objects:
- Operating System
- Logical disk
- Network Adapters
Optionally, you can enable discoveries for:
- Individual Logical Processors
- Physical Disks
I don’t recommend enabling additional discoveries unless you are sure that your monitoring requirements cannot be met without discovering these additional objects, as they will reduce the scalability of your environment.
Out of the box – for an OS like RedHat – here is a list of the monitors in place, and the object they target:

There are also 50 or more rules enabled out of the box. 46 are performance collection rules for reporting, and 4 rules are event based, dealing with security. Two are informational letting you know whenever a direct login is made using root credentials via SSH, and when su elevation occurs by a user session. The other two deal with failed attempts for SSH or SU.
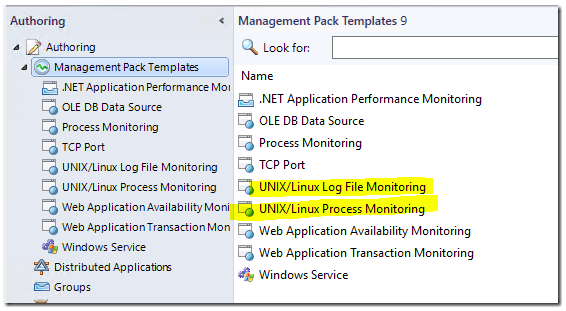
To get more out of your monitoring – you might have other services, processes, or log files that you need to monitor. For that, we provide Authoring Templates with wizards to help you add additional monitoring, in the Authoring pane of the console under Management Pack templates:


In the reporting pane – we also offer a large number of reports you can leverage, or you can always create your own using our generic report templates, or custom ones designed in Visual Studio for SQL reporting services.

As you can see, it is a fairly well rounded solution to include Unix and Linux monitoring into a single pane of glass for your other systems, from the Hardware, to the Operating System, to the network layer, to the applications.
Partners and 3rd party vendors also supply additional management packs which extend our Unix and Linux monitoring, to discover and provide detailed monitoring on non-Microsoft applications that run on these Unix and Linux systems.
Troubleshooting:

The majority of troubleshooting comes in the form of failed discovery/agent deployments.
Microsoft has written a wiki on this topic, which covers the majority of these, and how to resolve:
http://social.technet.microsoft.com/wiki/contents/articles/4966.aspx
And here:
Hi Kevin, thank you for the article, great information as always 🙂
It is a shame that support was dropped for AIX, I have a question for this: are SCOM 2019 AIX agents still able to report to SCOM 2022 (albeit unsupported), or would SCOM 2022 not recognise an AIX agent reporting back at all?
-George S.
SCOM 2022 does recognize the AIX agent still. However there are no fixes for important updates.
Check at NiCE, they provide a AIX MP that is compatible and supported: https://www.nice.de/2022/06/14/monitoring-aix-and-linux-on-ibm-power-using-microsoft-scom/
We upgraded our environment to SCOM 2022 and all of the AIX agents appeared to be working fine. But then we tried updating an AIX agent shortly afterwards and the results were catastrophic, with all agents of all operating systems ultimately becoming disconnected. Microsoft, not supporting AIX with SCOM 2022, recommended we revert to the backups taken prior to the upgrade, which we did.
Hello Kevin,
Would it be possible to monitor server Linux RedHat 8 having PowerPc architecture with this version of Scom ?
Thanks
Hi, you should modify the paths since this applies to SCOM 2022 and not SCOM 2016…
C:\Program Files\Microsoft System Center 2016\Operations Manager\Server>scxcertconfig.exe -export \\servername\sharename\OM2.cer
By me this was installed by default in the following path: C:\Program Files\Microsoft System Center\Operations Manager\Server
Thank you – fixed
SCOMMON appears for 2 different user profiles in Linux/UNIX .
Is this an error ?
You can use a single monitoring account with different profiles for elevate and not elevate. Or, some prefer to use separate monitoring accounts for this.
I followed all your instructions, but I always get this error:
Exception message: Unable to create certificate context ; {ASN1 bad tag value met. }
I tried to:
Renew certificates
Delete and renew certificates
Cross check the permissions on the profiles
Nothing worked. I also find very little documentation on the web about this specific error. Any hint ?
Thanks 🙂
What OS are you deploying the agent to?
RHEL 8.5
I forgot: when I start the process to add the server, it does not say “Install agent and manage”, but instead it says “Sign Certificate and Manage”.
Do I miss something here ?
This means someone already installed a SCOM agent on this server, and it will try to overwrite the certificate. Which probably won’t work. You likely need to remove the agent and any certificate files left behind from previous installations, and attempt a clean install.
Omg. I feel very stupid XD
I will try to understand who installed it and how to remove. By the way, I am using SCOM 2019, but I think the instructions are the same.
Thanks for help
I managed to remove the agent installed probably by mistake when we started working on this area (we are not expert with Linux).
Now it lets me install the angent, but it fails with this odd message:
Failed to install kit. Exit code: 1
Standard Output: Sudo path: /usr/bin/
Standard Error:
We trust you have received the usual lecture from the local System
Administrator. It usually boils down to these three things:
#1) Respect the privacy of others.
#2) Think before you type.
#3) With great power comes great responsibility.
sudo: a terminal is required to read the password; either use the -S option to read from standard input or configure an askpass helper
Exception Message:
Nothing else is written.
Now I am confused….
Were you able to resolve this, facing same issue with red hat 9.1
We are also facing this issue, did any one get the solution for this error.
We are also seeing this same issue when trying to deploy to Ubuntu 22.04. No idea how to resolve this….
is the sudoers file setup for the monitoring user?
which version of scom? which agent version? redhat 9 etc need an updated agent to work
SCOM Version: 2022 UR2 with the Linux fixes.
Linux: SuSE 15 Enterprise
I had the same issue and spent quite a good time on debugging, I found that the .sh script is does match the regex that are put into the sudo file:
Script was called: scx-1.9.1-0.universalr.1.s.x64.sh
the .s. was not included
So I ended up doing this with this:
scommaint ALL=(root) NOPASSWD: /bin/sh -c sh /tmp/scx-scommaint/scx-1.[5-9].[0-9][0-9]-[0-9].universal[[\:alpha\:]].[[\:digit\:]].s.x[6-8][4-6].sh –install –enable-opsmgr; EC=$?; cd /tmp; rm -rf /tmp/scx-scommaint; exit $EC
scommaint ALL=(root) NOPASSWD: /bin/sh -c sh /tmp/scx-scommaint/scx-1.[5-9].[0-9]-[0-9].universal[[\:alpha\:]].[[\:digit\:]].s.x[6-8][4-6].sh –install –enable-opsmgr; EC=$?; cd /tmp; rm -rf /tmp/scx-scommaint; exit $EC
scommaint ALL=(root) NOPASSWD: /bin/sh -c sh /tmp/scx-scommaint/scx-1.[5-9].[0-9][0-9]-[0-9].universal[[\:alpha\:]].[[\:digit\:]].s.x[6-8][4-6].sh –upgrade –enable-opsmgr; EC=$?; cd /tmp; rm -rf /tmp/scx-scommaint; exit $EC
scommaint ALL=(root) NOPASSWD: /bin/sh -c sh /tmp/scx-scommaint/scx-1.[5-9].[0-9]-[0-9].universal[[\:alpha\:]].[[\:digit\:]].s.x[6-8][4-6].sh –upgrade –enable-opsmgr; EC=$?; cd /tmp; rm -rf /tmp/scx-scommaint; exit $EC
Can SCOM monitor a Linux KVM ? Since it works almost like a VMWare hypervisor, can it monitor the KVM itself ?
Yes and no. not out of the box but it can, you just have to create monitors and rules or find someone else who has.
do be aware this can trip the return data size being above the allowed max breaking monitoring if there are sufficient virtual network adapters. we had openstack and it kept breaking those hosts constantly.
Microsoft will tell you its your custom monitoring doing it but all of ours returns an integer or one word, so well under this max. getting the response size on the network adapter query they were well over x7 the limit
Hello,
Just to confirm.
Looking here: https://learn.microsoft.com/en-us/system-center/scom/plan-supported-crossplat-os?view=sc-om-2022#universal-linux-debian-package-1
With the hotfix: https://support.microsoft.com/en-us/topic/system-center-operations-manager-2022-now-has-openssl3-0-integration-kb-5024286-331bd221-10f9-42d5-bc06-775eaabe3081
RHEL 9 should be supported. I seem to be having an issue in the earliest part of the discovery process, getting this:
Exception Message:An exception (-1073479162) caused the SSH command to fail – Server unexpectedly closed network connection
I’ve check many things and imported RHEL 8 systems without issue. I can connect via SSH from the SCOM MGMT server using the credentials I am using in the discovery, so have confirmed connectivity from that host.
I’ve confirmed the steps above.
Any suggestions?
Thanks,
Jon
https://techcommunity.microsoft.com/t5/system-center-blog/announcement-adding-support-for-latest-linux-os-ubuntu-22-04-amp/ba-p/3762157
This is useful, discusses (in the comments) the issue and provides a workaround for RHEL 9.0 but does not apparently work in RHEL9.1.
https://techcommunity.microsoft.com/t5/system-center-blog/announcement-adding-support-for-latest-linux-os-ubuntu-22-04-amp/ba-p/3762157
Here is a RHEL article discussing the changes the workaround recommends:
https://access.redhat.com/documentation/en-us/red_hat_enterprise_linux/9/html/security_hardening/using-the-system-wide-cryptographic-policies_security-hardening#proc_re-enabling-sha-1_using-the-system-wide-cryptographic-policies
with the agent update to 1.7 this seems to have addressed this as the issue was with openssl 3.0 which OMI was not able to support at the time.
in our lab we were able to support all 9.x tested and ubuntu etc which were using openssl 3.0. no messing around just nice clean installs.
This is very helpful, thank you! If a Linux service is detected to be stopped, can SCOM restart the service automatically?
Absolutely. You’d need to write a recovery action for this. It’s likely not really easy to do in the SCOM UI, however.
I agree it is quite frustrating that a number of these things can’t easily be done via the std console and need some authoring tool (even if that’s just a hard headedness and notepad)
and that’s another thing to remember about recovery/diagnostic tasks is that they may run on the windows box doing the monitoring not the target object
I actually figured out what I did wrong. I not only deleted the addon MPs, I deleted some of the default out of the box ones.
The biggest question I don’t see answered is what happens when the signer of the xplat cert has an expired cert itself. sure 10 year expiry I know but if you migrated the certs across so you could multihome the boxes you could see this easily ie the mgmnt servers cert is expired but the Unix server cert isn’t
3-4 servers sure no issue fixing but since this doesn’t alert prior to expiring this can be messy with 100+
Hi Kevin, I accidently upgraded parts of the Linux MP from 2019 to 2022 (running SCOM 2019). I’ve removed the management packs fully, and reinstalled, but each time there are parts missing. I no longer see the option for Linux in the discovery wizard, run as configurations. Also when I go to update the management packs, I see options for 2022. Is there a way to correct this, or am I looking at having to restore the databases?
Hi Kevin !
I have a question about SCOM upgrade from 2019 to 2022
Should I replace sudoers file on all Linux agents if I ‘ve had already the latest version of Linux/Unix MP on my 2019 environment , either before upgrading to 2022 of after ?
the sudo file should only need to be updated if they (MS) mess with the naming of the agent again. I’m pretty sure this hasn’t changed post 2019 (at time of writing)
hi
I notice that you include colons (\:alpha\:]].[[\:digit\:]) in your sudoers syntax compared to the the original file in the MS article, why is that?
I used the Universal RPM for SCOM 2019 (RHEL8+) code section and it gave me a syntax error when saving the visudo on the \alpha as those colons or not there for seven lines..
would sincerely appreciate your input on why this is the case and why I perhaps needs them in there compared to MS article?
thanks
feel free to edit the regex to suit you, and your ability to support the file.
for example its universal R or D not technically [[:alpha:]] so you can limit it to just those two options, to make the sudoers file limit the name to a much tighter match. Its what we do.
the end result needs to be the same, it needs to be able to install/etc, how you get there can vary to suit your ability to support regex, or other peoples in the orgs ability to do so, even personal/org preferences. It just best practice to limit this as much as possible.
you can even add future proofing to the version numbering with ‘one or more’, or between 1 and X ie
[0-9]+
[0-9]{1,3}
this is a sudoer thing more than a ‘scom’ thing…
Hi Kevin, Thanks for your great posts.
Like many people, as I can read on the web, I had issues to discover linux computers with SCOM2022 (Failed to find a matching agent kit to install).
Is there some documentation or useful information to troubleshoot/author that part ?
I mean I have:
– a ‘UNIX/Linux Supported Agent Class’ instance created with [Microsoft.Unix.SupportedAgent].Version, Build, OS, Arch ….TaskVersion
– an agent installation file embedded in the MP are copied in %installdir%\Operations Manager\Server\AgentManagement\UnixAgents\DownloadedKits
The agent (not already installed) discovery seems to go fine to push and execute GetOSVersion.sh.
(I assume it’s what Invoke-SCXDiscovery returns in OSInfo : IsLinux,…,Version,Alias,Name)
But in the InstallableKit info returned by the discovery was empty.
(What I find strange is that the discovery script return RHEL, and the discovery shows Alias: UniversalR )
It’s solved in the meantime, but I don’t really understand how it works between the GetOSVersion.sh and the copy of the install agent on the remote computer. I assume the discovery results and maybe the installation file name must match some of the supported agent class properties, but there should be something else.
If you had some insights to share on this that would be great.
Best regards,
you’re not trying to monitor an ancient linux are on a clean/new scom install?
ie redhat 5/Solaris/etc needs an old MP installed with an old agent to match, and if you don’t have these you will get that error.
Hi Dwayne,
Fresh SCOM 2022 + UR2 install.
Trying to monitor RHEL8 and 9.
I think removing linux MP’s and reverting to linux MP’s from UR1 did help at the time.
What I wanted to understand is how it works under the hood in order to troubleshoot when I have issues. We get data from Invoke-SCXDiscovery, we have an agent install script bundled in the MP, we have SupportedAgent class ins the MP … how all that is linked in SCOM, and in which order the workflow runs ?
Best regards,
sorry for late reply…
we had this occur in older versions with things like cent os when it had (core) in the version queried by scom. if you removed this it installed fine.
it may be a string in the version that’s causing an issue, but I found on a clean scom 2022 we had no issues with rhel8/9… well 9’s after the cim update so UR2 should be fine.
A lot of good comments, but none that fit my scenario. I have SCOM 2022 UR2 installed, but can’t manage Ubuntu 22.04. During the discovery I get the error below, and I have tried with HF KB5037360 installed, but can’t make any progress. Any suggestions?
SSH connection error
Failed during SSH discovery. Exit code: -1073479118
Standard Output:
Standard Error:
Exception Message:An exception (-1073479118) caused the SSH command to fail – Server sent disconnect message: type 2 (protocol error : Too many authentication failures)
I am having very similar issues – MS seem to be in the trenches with getting the Linux monitoring working consistently.
This might help:
https://unix.stackexchange.com/questions/721606/ssh-server-gives-userauth-pubkey-key-type-ssh-rsa-not-in-pubkeyacceptedalgorit
Thanks for the great manual!
What i learned (and miss in your description): if can’t use winrm basic auth (whats good), then you have to kerberos join the linux client AND the monitoring user must exist in the Active directory with same username and password.
The installation works with the scommaint user, the signing and exchange of the certificate works – via ssh
but
as soon as this is finished Scom wants to verify the connection and switches to winrm/kerberos – and therefore, the linux machine authenticates the user against AD ….
Everything works until “winrm The user name or password is incorrect”
kr
martin
Correct me if i am wrong, but thats what i discovered.
We faced the same issue. Switiching to WinRm/Kerberos did lead to “Invalid Credentials” after successfully signing the certificate via the discovery wizard.
Adding the package krb5-workstation via “sudo dnf install -y krb5-workstation” on RedHat 8/9 did solve this.
Best Regards
Stefan
Is there a latency requirement/max for the comms between the MS and Linux boxes (like the MS has to have a <10ms ping time to the OM/OMDW DBs)?
there is but its not 10ms. you can easily monitor Linux servers in the cloud or other DC’s without having issues. same as for windows. the default timeouts are reasonable.
That 10ms garbage is a joke. we you cant have a DR DC across the street, but have to have it over 1000KM away even a 21ms latency they say isn’t good enough… there solutions to get around that are no better than such an insane latency requirement that only seems to impact resource pool health
For Linux Servers setting the sudoers file that way is a major security violation. Is there any other way to set the password set and still have SCOM work ?
Kevin do you have any troubleshooting tips for custom performance rules that seem to store no data.
I know for monitors I need to export MP and change string to integer for an real value comparisons but following what’s out there on setting up performance rules for Linux doesn’t seem to work for me. Monitors work using same basic scripting so rights etc are *right*
Hello Kevin, how are you? I use your posts a lot, they are very useful and detailed, congratulations on that. At this moment, I need to monitor a specific log on an Aix server, looking for a specific failure message, and generate an alert when this occurs. Do you have any suggestions or documents that detail this? Thanks for the great work!
We are having an issue deploying the Linux client in our SCOM 2019 environment.We’ve created local accounts (scomadm and scomuser) for our Linux servers and include those in the sudoers file. If we discover the client using the runas accounts, it completes the discovery but fails on the managing client section due to insufficient permissions for the cert signing. If I repeat the discovery using my domain admin creds, it completes successfully. Any help would be appreciated.
sounds like a sudoer issue or how you expect to elevate the access
no idea why on a linux box you have two scom accounts. the one for the agent should be given a very strict list of what it can do via sodoers as per kevins example above.
The agent install needs an account that can access the files in the sudoer list above. so if your user has no elevated rights you cant use that to install.
Pingback:Comprehensive Troubleshooting Guide for SCOM Linux/UNIX Agents | POHN IT-Consulting GmbH
Hi, we have the following issue: we have manually installed the agents to the client computers, can see whethere they are avalable or not, but can not configure other monitors. Any suggestions ?
Hello Kevin,
is it possible to monitor Linux servers through QAS or pushing/delegate Sudo permissions through Group Policy.
Quest Authentication Services (QAS):
This is a technology developed by One Identity (formerly Quest Software) that extends Active Directory’s security and compliance features to Unix, Linux, and Mac systems. It allows for centralized authentication and single sign-on by integrating these platforms with Active Directory, improving operational efficiency and compliance in cross-platform environments.
Getting this error whenever I try to run scxcertconfig.exe. We are currently running SCOM 2022 UR3. Is anyone facing the same issue?
The procedure entry point ?signcertificate@scxcertlib@@QEAAXAEAVScxBuffer@@@Z could be located in the dynamic link library “Installation path”
Were you able to find a solution for this? I am also seeing this error.
Not yet. I am still getting the same error
can we add one Linux server to two different management Group
HI Kevin we are getting an error during Linux server Discovery Object reference not set to an instance of an object.
we have full privileges to Linux machine and port is also working fine, correct MP’s are imported, for testing we have removed other MS from Linux pool, all Run as account and profile mapped as recommended not sure what do next.
Might be issue with Kerberos Authentication issue because when we run this cmd we are getting Error number: -2147024891 0x80070005 which is Access is denied. not sure how to fix this
winrm e http://schemas.microsoft.com/wbem/wscim/1/cim-schema/2/SCX_Agent?__cimnamespace=root/scx -r:https://:1270 -u: -p: -auth:Kerberos -skipcacheck -skipcncheck -encoding:utf-8
Hi All not sure if all of you have faced the same issue with Linux Kerberos authentication if was fixed out by having cronjob with the help of Microsoft but still facing issue during Linux agent discovery as Object reference not set to an instance of an object. As Kerberos authentication has been supported by Linux agent but we don’t have documentation so far what exactly is needed or pre-requisites for Linux Kerberos authentication:
let’s try to build the “omi.keytab” from the “host.keytab” using this cron job.
#!/bin/sh
tmpfile=$(mktemp)
OMI_HOME=/opt/omi
syskeytab=”/etc/opt/quest/vas/host.keytab”
omikeytab=”/etc/opt/omi/creds/omi.keytab”
ktstrip=”$OMI_HOME/bin/support/ktstrip”
which ktutil >/dev/null 2>&1
if [ $? -eq 0 ]; then
# prime the omi keytab
[ -f $syskeytab ] && [ \( ! -f $omikeytab \) -o \( $syskeytab -nt $omikeytab \) ] && sleep 5 && $ktstrip $syskeytab $omikeytab >/dev/null 2>&1 || true
crontab -l > $tmpfile 2> /dev/null || true
# We don’t worry about log rotate
# execute the check every minute.
echo “* * * * * [ -f $syskeytab ] && [ \( ! -f $omikeytab \) -o \( $syskeytab -nt $omikeytab \) ] && sleep 5 && $ktstrip $syskeytab $omikeytab >/dev/null 2>&1 || true” >>$tmpfile
crontab $tmpfile
timestamp=$(date +%F\ %T)
printf “$timestamp : Crontab configured to update omi keytab automatically\n”
else
printf “ktutil not found\n”
fi
Hi!
I have followed the guide and verified that ports etc are open between the servers. However as soon as I try to discover the ubuntu server it throws an error saying “Object reference not set to an instance of an object” and discovery fails. It works fine when discovering windows machines.
Any help would be much appreciated.
Thank for the guide,
I have same message than OLA user with SCOM 2025 , windows discovery no issue, just have this ““Object reference not set to an instance of an object””
I believe this is addressed in SCOM 2025 UR1
You will see the error details under Monitoring tab -> task status and check Unix/Linux discovery related task.
This is something broken in SCOM 2025 that its not showing any resulting error on discovery console which we got in SCOM 2019. we are getting a more common error like Object reference not set to an instance of an object for all from which you cannot identify the actual cause
I believe this addressed in SCOM 2025 UR1
Is there a BIND DNS management packs available that supports LINUX DNS monitoring or in future pipeline?