Lets say I have three support levels of servers:
Level 1 – servers critical to business operations (ex: customer facing web applications, SQL back-ends)
Level 2 – important servers (ex: messaging, internal apps)
Level 3 – non-essential servers (ex: non-critical or highly redundant internal apps)
Lets say we want to create overrides for certain rules… where we will page on anything in Level 1 group, email notify on Level 2 group, and simply alert for Level 3. Possibly we want to create views, and only see alerts for Level 1 servers. Perhaps we wish to scope users so they only see Level 1 and Level 2 servers in the console?
Well – the first step is to place these servers into groups.
Sure – we can do this manually, with explicit assignments to the group. But that is resource intensive over time, and we might miss one down the road. I’d prefer to dynamically create the groups of Windows Computers based on a name…. but this can be difficult sometimes – where we don’t have a solid naming scheme, or other criteria to group by.
I will demonstrate another way to accomplish this… by coming up with a business process to use a registry key on your managed servers, and collect this registry attribute with SCOM. Then – use this Registry attribute for dynamic group memberships.
Ultimately – there are three simple steps to this process:
1. Create registry keys on agents.
2. Extended a class with an attribute, to discover the registry keys and values.
3. Create dynamic groups based on the attribute values from the registry.
It is just that simple.
To get started – lets talk about our custom registry key. For this example, I am going to create a new Key at HKLM\Software\ and call it “CompanyName”
Next – in that key – I will create a new DWORD Value, named “SupportLevel”
Lastly – I will assign a numeric value to “SupportLevel” on each server, either 1, 2, or 3.

In my environment…. my Hyper-V servers are critical. They host all of my VM’s, including many business critical applications. Therefore – they will get Level 1.
My Exchange 2007 servers handle all my mail traffic and notifications, so I will set their registry value to Level 2.
My Exchange 2003 servers have been retired – for MP testing only… so we will set those to Level 3.
Here is a table that shows what I am planning:
| ServerName | SupportLevel |
| VS1 | 1 |
| VS2 | 1 |
| VS3 | 1 |
| EX1CLN1 | 2 |
| EX1CLN2 | 2 |
| EXCAS | 2 |
| EX2CLN1 | 3 |
| EX2CLN2 | 3 |
| OWA | 3 |
So – I get all my registry values set on all computers. This is a big job at first, but it is a one time deal, and you can even script it if you are handy.
Next… we need to discover these registry entries in SCOM, as attributes of a class. Then were can use that attribute to group objects. Since I want Windows Computer objects in my groups (Windows Computer is a good object for most overrides, scoping, notifications…etc..) we would like to have these attributes added to the Windows Computer class.
However – there is a problem. The Windows Computer object is in a sealed MP. We cannot just add information to that class as we would like. Therefore – OpsMgr allows us to “Extend” an existing class… and add our custom attributes to it. This “Extended” class is basically a copy of the existing class… it will have all the built in attributes of Windows Computer, and will also have our custom attribute properties. It’s is easier to see it than to talk about it.
First – in the Ops console – authoring pane – go to Attributes. Create a new attribute. I am going to call this one “SupportLevel”

Next – choose “Registry” for the discovery type.
Next – We need to pick the Target class. We want Windows Computer. Note – this will create a new class, named “Windows Computer_Extended” by default. We can use this name, or you can rename this whatever you want. It is your class. I will leave it at the default.

Most important! Management Pack location.
This is CRITICAL. Spend some time making sure you are creating these attributes in the correct location. If you leave this MP unsealed XML…. then any groups you create that use these attributes, will have to be placed in this same MP. Then – if you use these groups for Overrides – those overrides will be force to go in this same MP. There is a “cardinal rule” in SCOM… objects in one unsealed MP cannot reference another unsealed MP. So – we cannot have a group in one unsealed MP, and then use that group for an override in another unsealed override MP.
So – we have two choices.
1. Keep an unsealed MP… and live with the fact that attribute, group, and override will all have to be placed here.
2. Create the attribute and the dynamic group in the MP, then seal it. Then – you can use this group in ANY of your override MP’s… for Exchange, SQL, etc…
I strongly recommend option #2 for this exercise… but you can make this decision for yourself.

Ok…. I will choose Option #2 (seal the MP), so I will create a new MP just for this extended class, and groups.
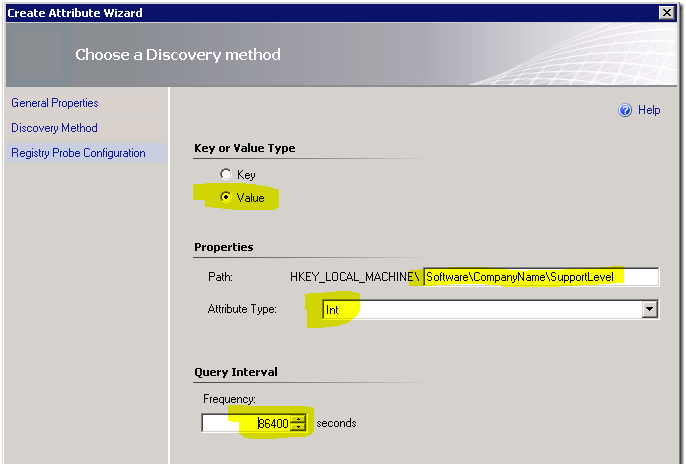
On the next screen – we can put in our registry information:
In this example – I am looking for a registry Value (1, 2, or 3), and my attribute type is “Int” for integer.
For the frequency, set this to a reasonable frequency to discover you machines as they come on to you network. Typically, once per day is sufficient (86400 seconds) Remember – this will run against ALL your Windows Computers… so never set this more frequent than once per hour… that creates unnecessary overhead.

Ok – lets examine our work!
Go to Monitoring, Discovered Inventory, and change target type to our new class “Windows Computer_Extended”
If you do this quickly – you may find it is empty. This is what is happening behind the scenes: All Windows Computers are now downloading our newly created MP. They are going to run the registry attribute discovery, and submit their discovery data to the management server. The Management Server will insert this discovery data in the database. Over time, you will start to see all your Windows Computers pop into this class membership. You will notice a new attribute now, in addition to all the existing Windows Computer attributes. This attribute is “SupportLevel” and will be 1, 2, 3, or empty… depending on what each agent find in the registry.
Now – I set my registry discovery to once per day…. so I will need to wait 24 hours before I can expect all my healthy agents to show up in this list. To speed things up – I am going to bounce the HealthService on these example agents. (Agents run all discoveries when a HealthService restarts, and then on their frequency schedule)
Here is an example a few minutes after bouncing the HealthService on some agents:

Next on the list – create the groups. I will create these in the same MP that the attributes exist in.
I will call my first group “CompanyName – Support Level 1 Servers Group”. I like to append the word “Group” to all groups I create as a best practice. This helps us determine this group class is actually a group when we see it in the list of classes in the UI. I sure wish all MP authors would take this to heart, since every group is actually a singleton class.

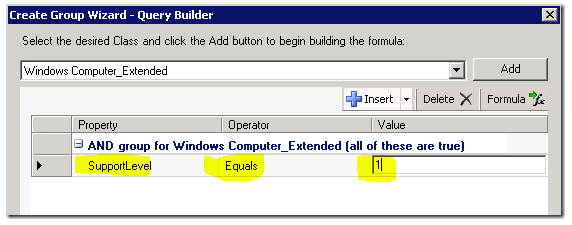
On the dynamic members screen – I will fins my “Windows Computer_Extended” class – and click Add. What we now see – is that we have a new attribute to use, “Support Level”

I will set this group to “SupportLevel Equals 1” and click OK.

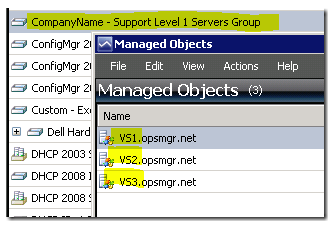
Now – I can right-click my new group – and choose “View Group Members”


Yee-haw! It works! Now – I simply repeat this above step – creating groups for SupportLevel 2, and 3.

Now – that is done. This is the area, that I recommend we stop… take a breather…. then seal the MP. If you seal the MP – we will be able to use the groups for overrides in any other override MP. If you choose not to seal the MP now… any overrides you use the groups for – will be forced into this same MP. Please keep that in mind.
Since I am harping on sealing the MP…. I am going to do a quick example of just that. Jonathan Almquist has an excellent tutorial on sealing MP’s HERE and we will use his example.
**Note – when running the sn.exe commands to create our key…. we only need to do this one… not every time we want to seal an MP.
***Critical note – you need to keep a backup of this key… because it will be required for making updates to this MP in the future, re-sealing, and keeping the ability to upgrade the existing MP in production.
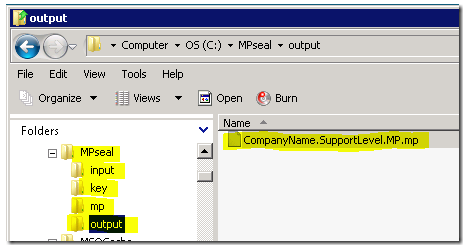
So, I create the folders, create the key using sn.exe, copy over the referenced MP’s from the RMS, and now I am ready to seal.
MPSeal.exe c:\mpseal\input\CompanyName.SupportLevel.MP.xml /I “c:\mpseal\mp” /Keyfile “c:\mpseal\key\PairKey.snk” /Company “CompanyName” /Outdir “c:\mpseal\output”
Works great.

Now – I can delete my unsealed MP from the management group, and import my sealed MP.
Phew. All the heavy lifting is done. Now… I have my groups… I can start setting up overrides using these groups, or scoping notifications.
On my Support Level 1 group – I will use this to set up my pager Notification subscriptions to only page based on specific classes, and this group.
On my Support Level 2 group – I will use this to override important alerts to High Priority… because I am using High Priority as a filter for email notifications, per my previous blog post here: https://kevinholman.com/2008/06/26/using-opsmgr-notifications-in-the-real-world/
On my Support Level 3 group – I will use this group for tweaking/disabling rules and monitors for the group… turning off discoveries so they don’t discover lab servers, scoping views, etc.
Maybe in my next post…. I will build on this MP… and show a really simple way to add the Health Service Watcher objects to these dynamic groups… for each Windows Computer object that is in the group – so we can use these groups for Heartbeat failure notifications.

Great stuff! But… 😉
I want to populate a group based on the existence of a registry key, not on a value – just to have a group for all computers that run a specific service. How do I define the group? There’s no “Exists” comparison in the dynamic members.
Christian
Hi again, I figured it out… it’s just
equals true
Cheers,
Christian 🙂
Great article !
Hi Kevin,
Did you manage to develop on this :
“Maybe in my next post…. I will build on this MP… and show a really simple way to add the Health Service Watcher objects to these dynamic groups… for each Windows Computer object that is in the group – so we can use these groups for Heartbeat failure notifications.”
Regards
Saiyad
I show how to add that membership rule in this article:
https://kevinholman.com/2021/08/24/creating-groups-of-windows-computers-that-contain-an-application-or-application-property/
And a similar example here:
https://kevinholman.com/2014/04/09/creating-groups-of-health-service-watcher-objects-based-on-other-groups/
Hello, I have been using this successfully to get some registry values as explained here.
But now I would like to use the new attribute to customize alert names like explained here:
https://kevinholman.com/2015/02/20/can-alert-names-contain-dynamic-data/#:~:text=Disclaimer%3A%20Dynamic%20data%20in%20the,supported%20or%20recommended%20by%20Microsoft.
Do you think it’s possible?
I want to do that for spécific custom monitors only.
thank you.
Regards